Achilles Tendon RuptureRuptured Heel Cord (Achilles) (Achilles Tendon Rupture)
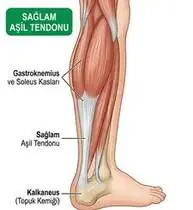
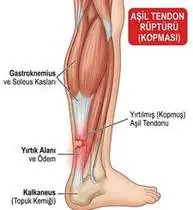
Achilles Tendon Rupture — Overview
Achilles tendon rupture is a complete or high-grade disruption of the body's thickest tendon within its hypovascular watershed zone (2–6 cm proximal to the calcaneal insertion), typically occurring in 30–50-year-old 'weekend warriors' during sudden eccentric dorsiflexion on a plantarflexed ankle (pushing off to sprint or landing from a jump). Modern evidence demonstrates that Accelerated Functional Rehabilitation in a hinged/wedge walking boot achieves equal low re-rupture rates in both surgical and non-surgical management—provided STRICT protection against passive dorsiflexion beyond neutral (0°) is maintained for the first 8–12 weeks to prevent tendon elongation!
An Achilles tendon rupture (ruptured heel cord) is a tear of the strong cord at the back of your ankle that connects your calf muscles to your heel bone—often feeling as if someone kicked or hit the back of your ankle during sports.
Primary Causes & Biomechanics
Key Points You Should Know
- •Sudden eccentric push-off load (up to 8–12x body weight) superimposed on pre-existing asymptomatic hypoxic tendinosis in the 2–6 cm watershed zone
- •Fluoroquinolone antibiotics (ciprofloxacin/levofloxacin) or local corticosteroid injections (which dramatically weaken Achilles collagen!)
- •Tendon Elongation Danger: Over-stretching the healing tendon into dorsiflexion before Week 8–12 permanently lengthens the tendon, causing lifelong loss of single-leg heel-raise power!
- •The #1 Golden Rule (Never Stretch the Tendon in the First 12 Weeks!): Unlike other ankle injuries, a healing Achilles tendon must NEVER be stretched upward past a flat 90-degree angle during the first 8–12 weeks! Stretching it early permanently lengthens the cord and weakens your tiptoe push-off.
- •Never Take a Single Step Barefoot Early On: Even stepping out of bed to go to the bathroom or standing in the shower without your protective boot can re-rupture the healing tendon!
- •Step-by-Step Heel Wedge Removal: Your boot wedges are lowered one by one over 6–8 weeks so the tendon ends knit tightly together.
Assessment Methods
1. Goniometric ROM & Postural / Kinematic Analysis
Resting ankle angle in prone (Matles test: ruptured foot hangs more vertical/dorsiflexed than the healthy plantarflexed foot) and carefully protected plantarflexion-to-neutral ROM.
2. Special Clinical Provocation & Neurological/Functional Tests
Thompson (Simmonds) Calf Squeeze Test (96% sensitivity / 93% specificity: squeezing the calf in prone fails to produce passive plantarflexion!), Matles Test, and palpable gap 2–6 cm above the calcaneus.
3. Standardized Clinical Outcome Scales & Imaging Criteria
ATRS (Achilles Tendon Total Rupture Score), Heel-Rise Endurance Test, and diagnostic ultrasound (measuring tendon end apposition in plantarflexion).
1. Range of Motion & Posture Check
Your physiotherapist gently evaluates how comfortably and smoothly your Achilles tendon (hypovascular watershed zone 2–6 cm proximal to the calcaneal insertion) and gastrocnemius-soleus complex moves and checks your overall posture.
2. Muscle Strength & Functional Movement Check
Your muscle balance, walking or reaching comfort, and specific gentle movement tests are evaluated without triggering sharp pain.
3. Typical Symptoms & Daily Impact Review
Sudden audible 'pop' or snap at the back of the ankle with the sensation of being kicked or struck in the back of the leg, followed by inability to push off onto tiptoes.
Treatment Options & Phase-Based Protocol
✨ Enriched GIF Exercise & Precaution GuidePhase 1: Acute Symptom Modulation, Tissue Protection & Early Activation
- •Phase 1 Clinical Focus & Tissue Protection: Equinus Protection & Proximal Activation Phase (Weeks 0–4): Walking boot with 3 heel wedges (20°–30° plantarflexion); perform proximal hip/knee strengthening (quad sets, 4-way SLR, side-lying hip abduction) and active toe motion.
- •Pain, Edema & Neuromuscular Modulation: Targeted physical modalities, relative load management, and early protected mobility of the Achilles tendon (hypovascular watershed zone 2–6 cm proximal to the calcaneal insertion) and gastrocnemius-soleus complex without provoking mechanical or inflammatory irritation.
- •Proximal & Distal Kinetic Chain Maintenance: Maintain active mobility and circulation in adjacent joints while protecting the primary healing structures in Achilles Tendon Rupture.
Phase 2: Progressive Mobility, Motor Control & Targeted Strengthening
- •Phase 2 Progressive Mobilization & Motor Control: Progressive Wedge Removal & Neutral (0°) Phase (Weeks 4–8): Remove 1 heel wedge every 2 weeks until reaching 0° neutral at Week 6–8; perform active plantarflexion and gentle return to 0° neutral (NEVER stretch past 0° neutral!) plus seated calf isometrics.
- •Biomechanical Alignment & Co-Contraction: Restore balanced agonist-antagonist force couples, joint centration, and multi-planar neuromuscular control across the Achilles tendon (hypovascular watershed zone 2–6 cm proximal to the calcaneal insertion) and gastrocnemius-soleus complex.
- •Myofascial Extensibility & Endurance: Address secondary compensatory tightness and build local muscular endurance within safe, symptom-free biomechanical parameters.
Phase 3: Functional Integration, Proprioception & Long-Term Prevention
- •Phase 3 Functional Integration & Long-Term Prevention: Graduated Tendon Loading & Return to Function Phase (Week 8–24+): Wean from boot into shoes with a small heel lift, progress from seated calf raises -> bilateral standing heel raises -> eccentric/single-leg heel raises and proprioceptive balance.
- •Proprioceptive Balance & Dynamic Loading: Progress to task-specific closed-chain, balance, and functional movement patterns tailored to daily life, occupational, or athletic demands.
- •Self-Management & Relapse Prophylaxis: Establish lifelong ergonomic habits, home exercise maintenance, and early warning-sign awareness to prevent recurrence.
Step 1: Calming Pain, Protecting the Area & Gentle Starter Motion
- •The #1 Golden Rule (Never Stretch the Tendon in the First 12 Weeks!): Unlike other ankle injuries, a healing Achilles tendon must NEVER be stretched upward past a flat 90-degree angle during the first 8–12 weeks! Stretching it early permanently lengthens the cord and weakens your tiptoe push-off.
- •Calm Protection & Gentle Start: During the initial stage of Ruptured Heel Cord (Achilles), avoid painful overloading and perform the gentle, pain-free starter movements shown below to support circulation and comfort.
- •Respecting Your Body's Signals: Every movement should stay within a comfortable, non-painful zone—never force through sharp or radiating pain.
Step 2: Restoring Flexibility & Building Supporting Muscle Strength
- •Never Take a Single Step Barefoot Early On: Even stepping out of bed to go to the bathroom or standing in the shower without your protective boot can re-rupture the healing tendon!
- •Step-by-Step Flexibility & Support: As acute sensitivity settles, gradually build mobility and strengthen the supporting muscles around the joint at a steady, controlled pace.
- •Posture & Breathing Coordination: Keep your posture upright and breathe smoothly (never hold your breath!) during every repetition.
Step 3: Safe Daily Habits, Stamina & Preventing Recurrence
- •Step-by-Step Heel Wedge Removal: Your boot wedges are lowered one by one over 6–8 weeks so the tendon ends knit tightly together.
- •Confident Return to Daily Life: Integrate your stronger muscles and improved balance into walking, stairs, work, and recreational activities.
- •Preventing Future Flare-Ups: Continue your core protective habits and key maintenance exercises even after symptoms resolve.
Animated (GIF) Therapeutic Exercise Guide
Animated clinical exercise protocol with biomechanical angles, target muscle groups, and dosage parameters (Click image to enlarge)
Step-by-step animated exercise demonstrations you can safely perform at home (Click image to enlarge)
 🔍 Enlarge
1. Rhythmic Active Ankle Dorsiflexion & Plantarflexion Pumping (Venous/Edema Pump)
1. Ankle Toe-Pulls and Pointing (Circulation & Swelling Pump)
Rhythmic alternating contraction of the tibialis anterior and gastrocnemius-soleus complex. Activates the deep venous calf pump to prevent deep vein thrombosis (DVT), clears distal edema, and maintains talocrural mobility. Specifically indicated in Achilles Tendon Rupture rehabilitation to optimize Achilles tendon (hypovascular watershed zone 2–6 cm proximal to the calcaneal insertion) and gastrocnemius-soleus complex biomechanics and neuromuscular control.
While lying down or sitting with your legs supported, pull your toes and feet firmly upward toward your shins, hold for 3 seconds, then point them downward like pressing a gas pedal. Perform smoothly within a comfortable, pain-free range to support your Ruptured Heel Cord (Achilles) recovery.
 🔍 Enlarge
2. Straight Leg Raise (SLR — Multi-Plane Isometric Knee Lock)
2. Supine Straight Leg Raise
Maintaining the knee locked in full extension (0°) with ankle dorsiflexion while elevating the lower extremity to 45° hip flexion. Strengthens the quadriceps and iliopsoas complex without compressing or shearing the articular surfaces. Specifically indicated in Achilles Tendon Rupture rehabilitation to optimize Achilles tendon (hypovascular watershed zone 2–6 cm proximal to the calcaneal insertion) and gastrocnemius-soleus complex biomechanics and neuromuscular control.
Bend your healthy knee with the foot flat on the bed. Tighten the thigh muscle of your affected leg to lock the knee straight, lift the leg to the height of the opposite knee, hold for 3 seconds, and lower slowly. Perform smoothly within a comfortable, pain-free range to support your Ruptured Heel Cord (Achilles) recovery.
 🔍 Enlarge
3. Intrinsic Foot Core ('Short Foot') & Medial Longitudinal Arch Activation
3. Seated Arch Doming (Short Foot) & Towel Scrunch
Drawing the first metatarsal head toward the calcaneus to elevate the medial longitudinal arch without curling the toes (or performing controlled towel curls). Strengthens the intrinsic plantar muscles supporting the subtalar and midtarsal joints. Specifically indicated in Achilles Tendon Rupture rehabilitation to optimize Achilles tendon (hypovascular watershed zone 2–6 cm proximal to the calcaneal insertion) and gastrocnemius-soleus complex biomechanics and neuromuscular control.
While seated with your foot flat on the floor (or on a small towel), gently draw the ball of your foot toward your heel to lift your inner arch without curling your toes, hold for 5 seconds, and relax. Perform smoothly within a comfortable, pain-free range to support your Ruptured Heel Cord (Achilles) recovery.
 🔍 Enlarge
4. Closed-Chain Bilateral/Eccentric Heel Raise (Triceps Surae & Achilles Loading)
4. Supported Standing Heel Raise & Slow Lowering
Controlled concentric heel elevation followed by slow (3–4 second) eccentric lowering into neutral dorsiflexion. Stimulates Type I collagen alignment in the Achilles/plantar aponeurosis and builds ankle plantarflexor propulsion. Specifically indicated in Achilles Tendon Rupture rehabilitation to optimize Achilles tendon (hypovascular watershed zone 2–6 cm proximal to the calcaneal insertion) and gastrocnemius-soleus complex biomechanics and neuromuscular control.
Hold lightly onto a wall or chair back. Rise up onto the balls of both feet, pause at the top, and slowly lower your heels back down to the floor over 3–4 seconds. Perform smoothly within a comfortable, pain-free range to support your Ruptured Heel Cord (Achilles) recovery.
 🔍 Enlarge
5. Seated Terminal Knee Extension (Open/Closed Chain VMO Focus)
5. Seated Knee Straightening & Hold
Concentric extension of the knee to the final 30°–0° terminal arc with isometric hold and ankle dorsiflexion. Restores terminal knee extension torque and stabilizes dynamic patellofemoral tracking. Specifically indicated in Achilles Tendon Rupture rehabilitation to optimize Achilles tendon (hypovascular watershed zone 2–6 cm proximal to the calcaneal insertion) and gastrocnemius-soleus complex biomechanics and neuromuscular control.
Sit upright in a chair and slowly straighten your knee completely while pulling your toes toward you. Feel the front thigh muscle tighten, hold for 5 seconds, and slowly lower your foot. Perform smoothly within a comfortable, pain-free range to support your Ruptured Heel Cord (Achilles) recovery.
 🔍 Enlarge
6. Single-Leg / Semi-Tandem Proprioceptive & Weight-Shift Balance Training
6. Supported Weight-Shifting & Tandem Balance Practice
Controlled mediolateral/anteroposterior weight shifting and tandem or single-leg stance near a stable support. Enhances mechanoreceptor feedback, ankle/hip postural reflexes, and dynamic gait stability. Specifically indicated in Achilles Tendon Rupture rehabilitation to optimize Achilles tendon (hypovascular watershed zone 2–6 cm proximal to the calcaneal insertion) and gastrocnemius-soleus complex biomechanics and neuromuscular control.
Stand near a counter or sturdy chair for safety. Place one foot slightly in front of the other (or shift your weight smoothly from side to side) and hold your balance upright for 20–30 seconds. Perform smoothly within a comfortable, pain-free range to support your Ruptured Heel Cord (Achilles) recovery.
Movements to Avoid & Strict Precautions
1. Stretching the Ankle Upward (Dorsiflexion Past 0° Neutral) in the First 8–12 Weeks (STRICTLY FORBIDDEN!)
1. Stretching your calf or pulling your foot upward past a flat angle in the first 8–12 weeks (permanently stretches out the tendon!)
2. Taking Even ONE Step Barefoot Without the Protective Boot (At Night or in the Shower!)
2. Walking even one step barefoot to the bathroom or in the shower without your boot
3. Removing Heel Wedges From the Boot Faster Than Scheduled
3. Taking heel wedges out of your boot earlier than your doctor/physiotherapist instructed
4. Running, Jumping, or Plyometrics Before 16–20+ Weeks and Full Single-Leg Heel-Raise Strength
4. Running or jumping before you can comfortably perform strong single-leg heel raises
Achilles Tendon Rupture — Video Guide
Click directly on any video to open and watch in a window, or review details via 📋 Summary & Options.
Condition Overview Video (1 Video)
Summary of pathophysiology, biomechanics, and clinical presentation
What the condition is, why it develops, and its basic mechanism

What Is an Achilles Tendon Rupture? How Is It Treated?
Achilles tendon rupture is a complete or high-grade disruption of the body's thickest tendon within its hypovascular watershed zone (2–6 cm proximal to the calcaneal insertion), typically occurring in 30–50-year-old 'weekend warriors' during sudden eccentric dorsiflexion on a plantarflexed ankle (pushing off to sprint or landing from a jump). Modern evidence demonstrates that Accelerated Functional Rehabilitation in a hinged/wedge walking boot achieves equal low re-rupture rates in both surgical and non-surgical management—provided STRICT protection against passive dorsiflexion beyond neutral (0°) is maintained for the first 8–12 weeks to prevent tendon elongation!
An Achilles tendon rupture (ruptured heel cord) is a tear of the strong cord at the back of your ankle that connects your calf muscles to your heel bone—often feeling as if someone kicked or hit the back of your ankle during sports.
Treatment and Exercise Videos
Phase-based physiotherapy protocols, mobilization, and therapeutic exercises
Step-by-step recovery and safe home exercise applications

Achilles Tendon Rehabilitation and Progressive Loading Exercises
Phase 1: Acute Symptom Modulation, Tissue Protection & Early Activation: Phase 1 Clinical Focus & Tissue Protection: Equinus Protection & Proximal Activation Phase (Weeks 0–4): Walking boot with 3 heel wedges (20°–30° plantarflexion); perform proximal hip/knee strengthening (quad sets, 4-way SLR, side-lying hip abduction) and active toe motion.
Step 1: Calming Pain, Protecting the Area & Gentle Starter Motion: The #1 Golden Rule (Never Stretch the Tendon in the First 12 Weeks!): Unlike other ankle injuries, a healing Achilles tendon must NEVER be stretched upward past a flat 90-degree angle during the first 8–12 weeks! Stretching it early permanently lengthens the cord and weakens your tiptoe push-off.

Soleus and Gastrocnemius (Seated & Standing Calf) Specific Loading Exercises
Phase 2: Progressive Mobility, Motor Control & Targeted Strengthening: Phase 2 Progressive Mobilization & Motor Control: Progressive Wedge Removal & Neutral (0°) Phase (Weeks 4–8): Remove 1 heel wedge every 2 weeks until reaching 0° neutral at Week 6–8; perform active plantarflexion and gentle return to 0° neutral (NEVER stretch past 0° neutral!) plus seated calf isometrics.
Step 2: Restoring Flexibility & Building Supporting Muscle Strength: Never Take a Single Step Barefoot Early On: Even stepping out of bed to go to the bathroom or standing in the shower without your protective boot can re-rupture the healing tendon!
Clinical Assessment, Goniometry & Special Test Videos
Displayed only in Healthcare Professional mode (hidden in Patient mode)

Thompson (Simmonds) Calf Squeeze Test — Achilles Tendon Rupture Examination
Goniometric ROM & Postural / Kinematic Analysis: Resting ankle angle in prone (Matles test: ruptured foot hangs more vertical/dorsiflexed than the healthy plantarflexed foot) and carefully protected plantarflexion-to-neutral ROM.

Achilles Tendon Integrity Assessment: Performing the Thompson Test
Special Clinical Provocation & Neurological/Functional Tests: Thompson (Simmonds) Calf Squeeze Test (96% sensitivity / 93% specificity: squeezing the calf in prone fails to produce passive plantarflexion!), Matles Test, and palpable gap 2–6 cm above the calcaneus.

Ankle and Foot Goniometric Measurement (Dorsiflexion, Plantarflexion, Inversion/Eversion)
Standardized Clinical Outcome Scales & Imaging Criteria: ATRS (Achilles Tendon Total Rupture Score), Heel-Rise Endurance Test, and diagnostic ultrasound (measuring tendon end apposition in plantarflexion).