Femoroacetabular Impingement (FAI) SyndromeHip Impingement Syndrome (Femoroacetabular Impingement (FAI))
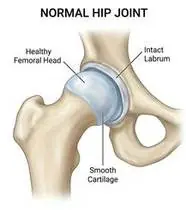
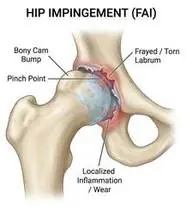
Femoroacetabular Impingement (FAI) Syndrome — Overview
Femoroacetabular Impingement (FAI) Syndrome is a motion-related clinical triad of symptoms, clinical signs, and imaging findings caused by premature mechanical abutment between an aspherical femoral head-neck junction (Cam morphology, common in young athletic males causing shear delamination of anterosuperior cartilage) and/or excessive acetabular rim coverage (Pincer morphology, common in females crushing the anterosuperior labrum) during combined hip flexion, adduction, and internal rotation.
Femoroacetabular impingement (hip impingement syndrome / FAI) occurs when an extra bony bump on the neck of the thighbone (Cam) or a deep overhanging rim of the hip socket (Pincer) causes the ball and socket to pinch the cartilage rim (labrum) whenever the hip bends deeply or twists inward.
Primary Causes & Biomechanics
Key Points You Should Know
- •Developmental Cam bump at the anterosuperior femoral head-neck junction (from high-impact adolescent sports before capital physis closure) or Pincer coxa profunda/acetabular retroversion
- •Anterior pelvic tilt reducing functional acetabular version and causing earlier bony contact during hip flexion
- •Weakness of the deep hip external rotators, gluteus medius/maximus, and posterior pelvic tilt core stabilizers
- •The 'C-Sign' Groin Ache: People with hip impingement classically cup their thumb and index finger in a 'C' shape around the front crease of the groin and side of the hip to show where it pinches.
- •Knees Below Hips When Sitting: Always adjust your office chair or car seat so your hips are higher than your knees—sitting in low bucket seats pinches the front of the hip!
- •Posterior Pelvic Tilt Creates Space: Gently tucking your tailbone/flattening excessive lower back arch tilts the hip socket up and out of the way of the thighbone.
Assessment Methods
1. Goniometric ROM & Postural / Kinematic Analysis
Hip flexion (typically restricted/painful >90–100°) and internal rotation at 90° hip flexion (markedly limited to <15–20°!).
2. Special Clinical Provocation & Neurological/Functional Tests
FADIR Test (Flexion + Adduction + Internal Rotation — 94–99% sensitivity for anterior impingement!), FABER Test, C-Sign (patient cups hand around the anterolateral hip/groin), and Thomas test.
3. Standardized Clinical Outcome Scales & Imaging Criteria
iHOT-12 / HAGOS (Copenhagen Hip and Groin Outcome Score), Alpha Angle (>55–60° indicates Cam) and Lateral Center-Edge Angle (>40° indicates Pincer) on Dunn-view radiographs, and MRA/3T MRI for labral tears.
1. Range of Motion & Posture Check
Your physiotherapist gently evaluates how comfortably and smoothly your femoroacetabular joint (femoral head-neck junction Cam morphology, acetabular rim Pincer morphology, and acetabular labrum) moves and checks your overall posture.
2. Muscle Strength & Functional Movement Check
Your muscle balance, walking or reaching comfort, and specific gentle movement tests are evaluated without triggering sharp pain.
3. Typical Symptoms & Daily Impact Review
Deep anterior groin pain ('C-sign') provoked by deep squatting, prolonged sitting in low chairs/cars, putting on shoes, or pivoting sports (soccer, martial arts, ice hockey).
Treatment Options & Phase-Based Protocol
✨ Enriched GIF Exercise & Precaution GuidePhase 1: Acute Symptom Modulation, Tissue Protection & Early Activation
- •Phase 1 Clinical Focus & Tissue Protection: Impingement Avoidance & Pelvic Alignment Phase (Weeks 1–2): Modify squatting depth (<70–80° hip flexion) and raise seat height so hips sit higher than knees; perform posterior pelvic tilts (rotates the acetabular rim anteriorly away from the femoral neck!) and unloaded <70° supine heel slides.
- •Pain, Edema & Neuromuscular Modulation: Targeted physical modalities, relative load management, and early protected mobility of the femoroacetabular joint (femoral head-neck junction Cam morphology, acetabular rim Pincer morphology, and acetabular labrum) without provoking mechanical or inflammatory irritation.
- •Proximal & Distal Kinetic Chain Maintenance: Maintain active mobility and circulation in adjacent joints while protecting the primary healing structures in Femoroacetabular Impingement (FAI).
Phase 2: Progressive Mobility, Motor Control & Targeted Strengthening
- •Phase 2 Progressive Mobilization & Motor Control: Gluteal & Deep Rotator Centering Phase (Weeks 2–6): Supine pelvic bridging, side-lying hip abduction (gluteus medius), standing hip abduction, and quadruped Bird-Dog to dynamically retract the femoral head.
- •Biomechanical Alignment & Co-Contraction: Restore balanced agonist-antagonist force couples, joint centration, and multi-planar neuromuscular control across the femoroacetabular joint (femoral head-neck junction Cam morphology, acetabular rim Pincer morphology, and acetabular labrum).
- •Myofascial Extensibility & Endurance: Address secondary compensatory tightness and build local muscular endurance within safe, symptom-free biomechanical parameters.
Phase 3: Functional Integration, Proprioception & Long-Term Prevention
- •Phase 3 Functional Integration & Long-Term Prevention: Neuromuscular Control & Hip-Friendly Squat Phase (Week 6–12): Sumo/slightly turned-out shallow wall squats (0°–45°), elevated chair sit-to-stand, and single-leg frontal plane pelvic control.
- •Proprioceptive Balance & Dynamic Loading: Progress to task-specific closed-chain, balance, and functional movement patterns tailored to daily life, occupational, or athletic demands.
- •Self-Management & Relapse Prophylaxis: Establish lifelong ergonomic habits, home exercise maintenance, and early warning-sign awareness to prevent recurrence.
Step 1: Calming Pain, Protecting the Area & Gentle Starter Motion
- •The 'C-Sign' Groin Ache: People with hip impingement classically cup their thumb and index finger in a 'C' shape around the front crease of the groin and side of the hip to show where it pinches.
- •Calm Protection & Gentle Start: During the initial stage of Hip Impingement Syndrome, avoid painful overloading and perform the gentle, pain-free starter movements shown below to support circulation and comfort.
- •Respecting Your Body's Signals: Every movement should stay within a comfortable, non-painful zone—never force through sharp or radiating pain.
Step 2: Restoring Flexibility & Building Supporting Muscle Strength
- •Knees Below Hips When Sitting: Always adjust your office chair or car seat so your hips are higher than your knees—sitting in low bucket seats pinches the front of the hip!
- •Step-by-Step Flexibility & Support: As acute sensitivity settles, gradually build mobility and strengthen the supporting muscles around the joint at a steady, controlled pace.
- •Posture & Breathing Coordination: Keep your posture upright and breathe smoothly (never hold your breath!) during every repetition.
Step 3: Safe Daily Habits, Stamina & Preventing Recurrence
- •Posterior Pelvic Tilt Creates Space: Gently tucking your tailbone/flattening excessive lower back arch tilts the hip socket up and out of the way of the thighbone.
- •Confident Return to Daily Life: Integrate your stronger muscles and improved balance into walking, stairs, work, and recreational activities.
- •Preventing Future Flare-Ups: Continue your core protective habits and key maintenance exercises even after symptoms resolve.
Animated (GIF) Therapeutic Exercise Guide
Animated clinical exercise protocol with biomechanical angles, target muscle groups, and dosage parameters (Click image to enlarge)
Step-by-step animated exercise demonstrations you can safely perform at home (Click image to enlarge)
 🔍 Enlarge
1. Supine Active-Assisted Heel Slide & Synovial Diffusion Mobilization
1. Supine Heel Slide (Gentle Knee & Hip Bending)
Controlled flexion and extension of the lower extremity by sliding the heel along the support surface without axial weight-bearing. Stimulates synovial fluid diffusion across avascular cartilage and prevents capsular adhesions. Specifically indicated in Femoroacetabular Impingement (FAI) rehabilitation to optimize femoroacetabular joint (femoral head-neck junction Cam morphology, acetabular rim Pincer morphology, and acetabular labrum) biomechanics and neuromuscular control.
While lying on your back, slowly slide your heel along the bed sheet toward your hip within a comfortable, pain-free angle, hold for 3 seconds, and gently slide it back out straight. Perform smoothly within a comfortable, pain-free range to support your Hip Impingement Syndrome recovery.
 🔍 Enlarge
2. Side-Lying Hip Abduction (Gluteus Medius & Frontal Plane Control)
2. Side-Lying Leg Lift (Outer Hip Strengthening)
Isolated strengthening of the gluteus medius in slight hip extension and neutral rotation. Prevents contralateral pelvic drop (Trendelenburg) and reduces dynamic knee valgus and medial compartment adduction moments. Specifically indicated in Femoroacetabular Impingement (FAI) rehabilitation to optimize femoroacetabular joint (femoral head-neck junction Cam morphology, acetabular rim Pincer morphology, and acetabular labrum) biomechanics and neuromuscular control.
Lie on your side with your bottom leg slightly bent for balance. Keep your top leg straight and slightly back, lift it up toward the ceiling without rolling your pelvis backward, hold for 3 seconds, and lower slowly. Perform smoothly within a comfortable, pain-free range to support your Hip Impingement Syndrome recovery.
 🔍 Enlarge
3. Quadruped Contralateral Arm-Leg Reach ('Bird-Dog' Multifidus & Deep Core)
3. All-Fours Opposite Arm & Leg Reach (Bird-Dog)
In quadruped with a neutral lumbopelvic spine and abdominal drawing-in (transversus abdominis), extending opposite upper and lower extremities horizontally without pelvic rotation or lumbar hyperextension. Minimizes spinal compressive load while maximizing multifidus recruitment. Specifically indicated in Femoroacetabular Impingement (FAI) rehabilitation to optimize femoroacetabular joint (femoral head-neck junction Cam morphology, acetabular rim Pincer morphology, and acetabular labrum) biomechanics and neuromuscular control.
On your hands and knees, keep your back flat like a tabletop and gently tighten your tummy. Slowly reach one arm forward and the opposite leg straight back withoutarching your lower back, hold for 5 seconds, and switch sides. Perform smoothly within a comfortable, pain-free range to support your Hip Impingement Syndrome recovery.
 🔍 Enlarge
4. Protected Closed-Kinetic-Chain Wall Mini-Squat (0°–40° Safe Arc)
4. Wall-Supported Safe Mini-Squat
Closed-kinetic-chain bilateral knee flexion in the safe 0°–40° arc with the back supported against a wall. Promotes quadriceps-hamstring-gluteal co-contraction and joint proprioception without excessive patellofemoral compression. Specifically indicated in Femoroacetabular Impingement (FAI) rehabilitation to optimize femoroacetabular joint (femoral head-neck junction Cam morphology, acetabular rim Pincer morphology, and acetabular labrum) biomechanics and neuromuscular control.
Lean your back flat against a wall with your feet shoulder-width apart. Slowly bend your knees slightly (30–40 degrees, keeping knees behind toes), hold for 5 seconds, and push back up. Perform smoothly within a comfortable, pain-free range to support your Hip Impingement Syndrome recovery.
 🔍 Enlarge
5. Supine Posterior Pelvic Tilt & Transversus Abdominis Activation (Abdominal Hollowing)
5. Supine Lower Back Flatten (Pelvic Tilt & Deep Core)
In hook-lying, gently drawing the umbilicus inward-upward (transversus abdominis) while tilting the pelvis posteriorly to flatten excessive lumbar lordosis against the mat. Decompresses posterior facet joints and narrows the intervertebral shear vector. Specifically indicated in Femoroacetabular Impingement (FAI) rehabilitation to optimize femoroacetabular joint (femoral head-neck junction Cam morphology, acetabular rim Pincer morphology, and acetabular labrum) biomechanics and neuromuscular control.
Lie on your back with your knees bent. Without holding your breath, gently draw your belly button inward and press the small of your back flat against the bed, hold for 5 seconds, and relax. Perform smoothly within a comfortable, pain-free range to support your Hip Impingement Syndrome recovery.
 🔍 Enlarge
6. Supine Lumbopelvic Bridging (Gluteus Maximus & Posterior Chain Co-Contraction)
6. Supine Hip Bridge (Controlled Pelvic Lift)
From hook-lying with transversus abdominis pre-activation, elevating the pelvis until hips, pelvis, and shoulders form a neutral diagonal line. Strengthens the gluteus maximus, hamstrings, and erector spinae synergy without lumbar hyperlordosis. Specifically indicated in Femoroacetabular Impingement (FAI) rehabilitation to optimize femoroacetabular joint (femoral head-neck junction Cam morphology, acetabular rim Pincer morphology, and acetabular labrum) biomechanics and neuromuscular control.
Lie on your back with your knees bent and feet flat hip-width apart. Gently tighten your tummy and glutes, lift your hips until your body forms a straight line from shoulders to knees, hold for 5 seconds, and lower slowly. Perform smoothly within a comfortable, pain-free range to support your Hip Impingement Syndrome recovery.
Movements to Avoid & Strict Precautions
1. Deep Squats Below Parallel (Ass-to-Grass), Deep Leg Presses, or Low Catcher's Squat
1. Deep squats past a right angle, deep leg-press machines, or crouching low
2. Forcing the Hip Into Flexion + Adduction + Internal Rotation ('Pigeon Pose' / Cross-Body Pinch)
2. Doing yoga stretches that jam the knee across the chest into groin pinching
3. Sitting in Low Bucket Car Seats or Low Sofas With Knees Higher Than Hips
3. Sitting for long periods in low seats where your knees are higher than your hips
4. High-Knee Sprinting, Hurdling, or Breaststroke Kick During Acute Flare
4. Doing high-knee jumps, breaststroke frog kicks, or high kicks while the groin is inflamed
Femoroacetabular Impingement (FAI) Syndrome — Video Guide
Click directly on any video to open and watch in a window, or review details via 📋 Summary & Options.
Condition Overview Video (1 Video)
Summary of pathophysiology, biomechanics, and clinical presentation
What the condition is, why it develops, and its basic mechanism

What Is Hip Impingement Syndrome (Femoroacetabular Impingement / FAI)?
Femoroacetabular Impingement (FAI) Syndrome is a motion-related clinical triad of symptoms, clinical signs, and imaging findings caused by premature mechanical abutment between an aspherical femoral head-neck junction (Cam morphology, common in young athletic males causing shear delamination of anterosuperior cartilage) and/or excessive acetabular rim coverage (Pincer morphology, common in females crushing the anterosuperior labrum) during combined hip flexion, adduction, and internal rotation.
Femoroacetabular impingement (hip impingement syndrome / FAI) occurs when an extra bony bump on the neck of the thighbone (Cam) or a deep overhanging rim of the hip socket (Pincer) causes the ball and socket to pinch the cartilage rim (labrum) whenever the hip bends deeply or twists inward.
Treatment and Exercise Videos
Phase-based physiotherapy protocols, mobilization, and therapeutic exercises
Step-by-step recovery and safe home exercise applications

Clinical Tests and Rehabilitation Exercises for Hip Impingement Syndrome
Phase 1: Acute Symptom Modulation, Tissue Protection & Early Activation: Phase 1 Clinical Focus & Tissue Protection: Impingement Avoidance & Pelvic Alignment Phase (Weeks 1–2): Modify squatting depth (<70–80° hip flexion) and raise seat height so hips sit higher than knees; perform posterior pelvic tilts (rotates the acetabular rim anteriorly away from the femoral neck!) and unloaded <70° supine heel slides.
Step 1: Calming Pain, Protecting the Area & Gentle Starter Motion: The 'C-Sign' Groin Ache: People with hip impingement classically cup their thumb and index finger in a 'C' shape around the front crease of the groin and side of the hip to show where it pinches.

Clinical Tests and Therapeutic Exercises in Hip and Groin Pain
Phase 2: Progressive Mobility, Motor Control & Targeted Strengthening: Phase 2 Progressive Mobilization & Motor Control: Gluteal & Deep Rotator Centering Phase (Weeks 2–6): Supine pelvic bridging, side-lying hip abduction (gluteus medius), standing hip abduction, and quadruped Bird-Dog to dynamically retract the femoral head.
Step 2: Restoring Flexibility & Building Supporting Muscle Strength: Knees Below Hips When Sitting: Always adjust your office chair or car seat so your hips are higher than your knees—sitting in low bucket seats pinches the front of the hip!
Clinical Assessment, Goniometry & Special Test Videos
Displayed only in Healthcare Professional mode (hidden in Patient mode)

FADIR Special Test — Femoroacetabular Impingement and Labral Pathology Exam
Goniometric ROM & Postural / Kinematic Analysis: Hip flexion (typically restricted/painful >90–100°) and internal rotation at 90° hip flexion (markedly limited to <15–20°!).

Hip Impingement (FADIR / FAI) Clinical Provocation Test
Special Clinical Provocation & Neurological/Functional Tests: FADIR Test (Flexion + Adduction + Internal Rotation — 94–99% sensitivity for anterior impingement!), FABER Test, C-Sign (patient cups hand around the anterolateral hip/groin), and Thomas test.

Hip Joint Goniometric Measurement (Flexion, Extension, Abduction, Rotations)
Standardized Clinical Outcome Scales & Imaging Criteria: iHOT-12 / HAGOS (Copenhagen Hip and Groin Outcome Score), Alpha Angle (>55–60° indicates Cam) and Lateral Center-Edge Angle (>40° indicates Pincer) on Dunn-view radiographs, and MRA/3T MRI for labral tears.