Paraplegia (Thoracolumbar SCI)Lower Body & Both Legs Paralysis (Paraplegia)
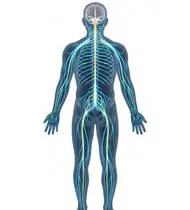
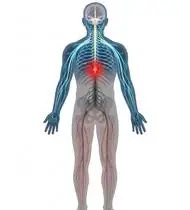
Paraplegia (Thoracolumbar SCI) — Overview
Paraplegia is motor, sensory, and autonomic impairment of the trunk, lower extremities, and pelvic organs resulting from a spinal cord or cauda equina lesion at T2 or below—Crucially, because the brachial plexus (C5–T1) exits above T2, upper extremity motor and sensory function is 100% intact! Functional prognosis is stratified by level: High Thoracic (T2–T6): intercostals/abdominals paralyzed, poor trunk balance, risk of Autonomic Dysreflexia (up to T6); Low Thoracic (T7–T12): partial-to-full abdominal & back extensor control, strong cough, independent wheelchair & floor-to-chair transfers; Lumbosacral (L1–S5): preserved hip flexors (L2), quadriceps (L3 — household/community ambulation with AFOs!), and ankle dorsiflexors (L4).Note that T12–L1 Conus Medullaris / Cauda Equina lesions produce a Lower Motor Neuron (flaccid, areflexic) paraplegia!
Paraplegia (lower body paralysis / T2 and below spinal cord injury) affects movement and sensation in the lower trunk and legs while leaving your arms, hands, and shoulders 100% strong and intact. Whether your goal is walking with braces/crutches in incomplete or lower-lumbar injuries, or mastering effortless transfers and active wheelchair life, protecting your shoulders, keeping your hips straight with daily tummy-lying, and protecting your skin are the keys to total independence!
Primary Causes & Biomechanics
Key Points You Should Know
- •Thoracolumbar burst fractures/dislocations (most common at the mobile T11–L2 thoracolumbar junction), spinal cord ischemia, or disc/tumor compression
- •Extreme Upper Extremity Overload: In paraplegia, the shoulders (rotator cuff & biceps) become the patient's 'legs' for propulsion and transfers—preserving shoulder health via scapular/posterior cuff strengthening is mandatory for lifelong independence!
- •Hip Flexor (Iliopsoas) & Adductor/Equinus Contracture Risk from prolonged wheelchair sitting—which blocks upright standing/KAFO ambulation if daily 30-minute prone lying is neglected!
- •Your Shoulders Are Your Lifeline—Protect Them! Because you use your arms for every transfer and wheelchair push, shoulder tendonitis is common if you only push forward. Doing daily shoulder blade squeezes (scapular retraction) and outward rotation exercises keeps your shoulders pain-free for life.
- •30 Minutes on Your Stomach Every Day: Sitting in a wheelchair bends your hips at 90 degrees all day; lying flat on your stomach for 30 minutes every day stretches the front of your hips straight so you can stand in braces or a standing frame.
- •Push-Up Every 20 Minutes: Lifting your hips off the cushion for 20–30 seconds every 20 minutes restores blood flow to your skin and prevents pressure sores.
Assessment Methods
1. Goniometric ROM & Postural / Kinematic Analysis
ISNCSCI T2–S5 sensory level and L2–S1 lower extremity motor score (LEMS 0–50), plus hip extension (Thomas test) and ankle dorsiflexion goniometry.
2. Special Clinical Provocation & Neurological/Functional Tests
Seated Trunk Balance Assessment (Static, Dynamic, and Multidirectional Reach), SCIM-III, WISCI-II, and Shoulder Impingement Screen (in manual wheelchair users).
3. Standardized Clinical Outcome Scales & Imaging Criteria
ISNCSCI (ASIA), SCIM-III, WISCI-II, and thoracolumbar MRI/CT.
1. Range of Motion & Posture Check
Your physiotherapist gently evaluates how comfortably and smoothly your thoracic, lumbar, or sacral spinal cord segments (T2–S5) and cauda equina, with 100% intact upper extremity innervation moves and checks your overall posture.
2. Muscle Strength & Functional Movement Check
Your muscle balance, walking or reaching comfort, and specific gentle movement tests are evaluated without triggering sharp pain.
3. Typical Symptoms & Daily Impact Review
Weakness or paralysis and sensory loss in the legs and lower trunk (below the chest/ribcage or waist) with normal strength and dexterity in both arms and hands.
Treatment Options & Phase-Based Protocol
✨ Enriched GIF Exercise & Precaution GuidePhase 1: Acute Symptom Modulation, Tissue Protection & Early Activation
- •Phase 1 Clinical Focus & Tissue Protection: Phase 1 — Contracture Prevention, Prone Lying & Upper Body Hypertrophy Phase: Mandatory 30 minutes of daily Prone Lying (flat on the stomach) to prevent hip flexion contractures, passive/active-assisted ankle pumps, towel gastro-soleus stretches & supine heel slides, and superficial/deep respiratory expansion.
- •Pain, Edema & Neuromuscular Modulation: Targeted physical modalities, relative load management, and early protected mobility of the thoracic, lumbar, or sacral spinal cord segments (T2–S5) and cauda equina, with 100% intact upper extremity innervation without provoking mechanical or inflammatory irritation.
- •Proximal & Distal Kinetic Chain Maintenance: Maintain active mobility and circulation in adjacent joints while protecting the primary healing structures in Paraplegia.
Phase 2: Progressive Mobility, Motor Control & Targeted Strengthening
- •Phase 2 Progressive Mobilization & Motor Control: Phase 2 — Seated Pressure Relief, Transfer Power & Shoulder Protection Phase: Seated wheelchair push-ups (lifting buttocks every 20 min for skin protection + building triceps/latissimus transfer power!), scapular retraction & towel-supported external rotation (protecting wheelchair-user shoulders from rotator cuff tears!), and seated trunk balance perturbations.
- •Biomechanical Alignment & Co-Contraction: Restore balanced agonist-antagonist force couples, joint centration, and multi-planar neuromuscular control across the thoracic, lumbar, or sacral spinal cord segments (T2–S5) and cauda equina, with 100% intact upper extremity innervation.
- •Myofascial Extensibility & Endurance: Address secondary compensatory tightness and build local muscular endurance within safe, symptom-free biomechanical parameters.
Phase 3: Functional Integration, Proprioception & Long-Term Prevention
- •Phase 3 Functional Integration & Long-Term Prevention: Phase 3 — Standing Frame / KAFO-AFO Ambulation & Incomplete Gait Phase: Daily standing frame or KAFO/AFO upright weight-bearing (preventing osteoporosis, renal stones, spasticity, and bowel stasis), and in Incomplete / Lumbar (L2–S1) lesions, supine pelvic bridging, side-lying hip abduction, chair sit-to-stand, and reciprocating gait training.
- •Proprioceptive Balance & Dynamic Loading: Progress to task-specific closed-chain, balance, and functional movement patterns tailored to daily life, occupational, or athletic demands.
- •Self-Management & Relapse Prophylaxis: Establish lifelong ergonomic habits, home exercise maintenance, and early warning-sign awareness to prevent recurrence.
Step 1: Calming Pain, Protecting the Area & Gentle Starter Motion
- •Your Shoulders Are Your Lifeline—Protect Them! Because you use your arms for every transfer and wheelchair push, shoulder tendonitis is common if you only push forward. Doing daily shoulder blade squeezes (scapular retraction) and outward rotation exercises keeps your shoulders pain-free for life.
- •Calm Protection & Gentle Start: During the initial stage of Lower Body & Both Legs Paralysis, avoid painful overloading and perform the gentle, pain-free starter movements shown below to support circulation and comfort.
- •Respecting Your Body's Signals: Every movement should stay within a comfortable, non-painful zone—never force through sharp or radiating pain.
Step 2: Restoring Flexibility & Building Supporting Muscle Strength
- •30 Minutes on Your Stomach Every Day: Sitting in a wheelchair bends your hips at 90 degrees all day; lying flat on your stomach for 30 minutes every day stretches the front of your hips straight so you can stand in braces or a standing frame.
- •Step-by-Step Flexibility & Support: As acute sensitivity settles, gradually build mobility and strengthen the supporting muscles around the joint at a steady, controlled pace.
- •Posture & Breathing Coordination: Keep your posture upright and breathe smoothly (never hold your breath!) during every repetition.
Step 3: Safe Daily Habits, Stamina & Preventing Recurrence
- •Push-Up Every 20 Minutes: Lifting your hips off the cushion for 20–30 seconds every 20 minutes restores blood flow to your skin and prevents pressure sores.
- •Confident Return to Daily Life: Integrate your stronger muscles and improved balance into walking, stairs, work, and recreational activities.
- •Preventing Future Flare-Ups: Continue your core protective habits and key maintenance exercises even after symptoms resolve.
Animated (GIF) Therapeutic Exercise Guide
Animated clinical exercise protocol with biomechanical angles, target muscle groups, and dosage parameters (Click image to enlarge)
Step-by-step animated exercise demonstrations you can safely perform at home (Click image to enlarge)
 🔍 Enlarge
1. Seated Depression Transfer Lift ('Push-Up' — Triceps, Latissimus & Pressure Relief)
1. Seated Arm-Press Trunk Lift (Transfer & Pressure Relief)
Pressing down on armrests or push-blocks with elbows extending and scapulae depressing to lift the buttocks clear of the seat. Essential for independent bed-to-wheelchair transfers, crutch ambulation, and relieving ischial tuberosity pressure every 20–30 minutes. Specifically indicated in Paraplegia rehabilitation to optimize thoracic, lumbar, or sacral spinal cord segments (T2–S5) and cauda equina, with 100% intact upper extremity innervation biomechanics and neuromuscular control.
While sitting securely in your chair or wheelchair with brakes locked, place your hands on the armrests and push down to lift your hips slightly off the seat for 5–10 seconds, then lower gently. Perform smoothly within a comfortable, pain-free range to support your Lower Body & Both Legs Paralysis recovery.
 🔍 Enlarge
2. Towel-Supported Glenohumeral External Rotation (Infraspinatus & Teres Minor)
2. Outward Forearm Rotation with Rolled Towel Under Elbow
External rotation performed at 90° elbow flexion with a rolled towel placed between the elbow and trunk (20°–30° scaption). Enhances infraspinatus/teres minor recruitment while preventing superior humeral head migration and deltoid shear. Specifically indicated in Paraplegia rehabilitation to optimize thoracic, lumbar, or sacral spinal cord segments (T2–S5) and cauda equina, with 100% intact upper extremity innervation biomechanics and neuromuscular control.
Place a small rolled towel between your elbow and your side with your elbow bent at 90 degrees. Keeping your elbow pressed gently against the towel, rotate your forearm outward, hold for 3 seconds, and return slowly. Perform smoothly within a comfortable, pain-free range to support your Lower Body & Both Legs Paralysis recovery.
 🔍 Enlarge
3. Scapulothoracic Retraction & Depression (Middle/Lower Trapezius & Rhomboids)
3. Shoulder Blade Squeeze (Postural Alignment)
Adduction and depression of the scapulae via the middle/lower trapezius and rhomboids while inhibiting upper trapezius overactivity. Corrects anterior scapular tilt, widens the subacromial outlet, and unloads the anterior thoracic column. Specifically indicated in Paraplegia rehabilitation to optimize thoracic, lumbar, or sacral spinal cord segments (T2–S5) and cauda equina, with 100% intact upper extremity innervation biomechanics and neuromuscular control.
Sit or stand tall. Keep your shoulders relaxed away from your ears, gently draw your shoulder blades together and slightly downward toward your back pockets, hold for 5 seconds, and release. Perform smoothly within a comfortable, pain-free range to support your Lower Body & Both Legs Paralysis recovery.
 🔍 Enlarge
4. Prone Positioning & Controlled Thoracolumbar Extension (McKenzie / Back Extensor)
4. Prone Lying & Gentle Back Extension Lift
Prone positioning and graduated thoracic/lumbar extension (with a pillow under the abdomen when indicated for spinal unloading). Counters flexed postural kyphosis, stretches tight hip flexors, and strengthens paraspinal extensors. Specifically indicated in Paraplegia rehabilitation to optimize thoracic, lumbar, or sacral spinal cord segments (T2–S5) and cauda equina, with 100% intact upper extremity innervation biomechanics and neuromuscular control.
Lie on your stomach (place a small pillow under your hips/tummy if needed for comfort). Gently lift your head and chest slightly off the mat by squeezing your back muscles without straining your neck, hold for 3–5 seconds, and lower. Perform smoothly within a comfortable, pain-free range to support your Lower Body & Both Legs Paralysis recovery.
 🔍 Enlarge
5. Supine Active-Assisted Heel Slide & Synovial Diffusion Mobilization
5. Supine Heel Slide (Gentle Knee & Hip Bending)
Controlled flexion and extension of the lower extremity by sliding the heel along the support surface without axial weight-bearing. Stimulates synovial fluid diffusion across avascular cartilage and prevents capsular adhesions. Specifically indicated in Paraplegia rehabilitation to optimize thoracic, lumbar, or sacral spinal cord segments (T2–S5) and cauda equina, with 100% intact upper extremity innervation biomechanics and neuromuscular control.
While lying on your back, slowly slide your heel along the bed sheet toward your hip within a comfortable, pain-free angle, hold for 3 seconds, and gently slide it back out straight. Perform smoothly within a comfortable, pain-free range to support your Lower Body & Both Legs Paralysis recovery.
 🔍 Enlarge
6. Long-Sitting Towel-Assisted Gastrocnemius-Soleus & Plantar Fascia Stretch
6. Seated Towel Calf & Foot Arch Stretch
Long-sitting with a towel looped around the metatarsal heads, applying a slow, sustained passive pull into ankle dorsiflexion. Restores gastrocnemius-soleus-Achilles length and reduces plantar fascial and equine tension. Specifically indicated in Paraplegia rehabilitation to optimize thoracic, lumbar, or sacral spinal cord segments (T2–S5) and cauda equina, with 100% intact upper extremity innervation biomechanics and neuromuscular control.
Sit with your leg extended and loop a towel around the ball of your foot. Gently pull both ends of the towel toward you until you feel a comfortable stretch in your calf and sole, holding for 20–30 seconds. Perform smoothly within a comfortable, pain-free range to support your Lower Body & Both Legs Paralysis recovery.
Movements to Avoid & Strict Precautions
1. Skipping the 20-Minute Wheelchair Pressure-Relief Push-Up / Lean (Causes Deep Pressure Ulcers!)
1. Sitting for hours without lifting or leaning to relieve pressure on your sit-bones, or sitting without a pressure-relieving cushion
2. Sitting All Day Without Lying Flat on Your Stomach (Prone) for 20–30 Minutes Daily (Causes Hip Flexion Contractures!)
2. Never lying flat on your stomach—if your hips tighten bent, you cannot stand upright in braces!
3. Dragging the Buttocks Across the Bed/Wheelchnair Wheel During Transfers (Shears Insensate Skin!)
3. Sliding or dragging your bare skin across the wheelchair wheel during transfers (always lift cleanly with Triceps push-ups or use a smooth transfer board!)
4. Pushing the Wheelchair With High, Jerky Shoulder Shrugs and Long Over-Reaches
4. Reaching too far back on the wheelchair rims with shrugged shoulders
Paraplegia (Thoracolumbar SCI) — Video Guide
Click directly on any video to open and watch in a window, or review details via 📋 Summary & Options.
Condition Overview Video (1 Video)
Summary of pathophysiology, biomechanics, and clinical presentation
What the condition is, why it develops, and its basic mechanism

What Is Paraplegia? Thoracolumbar Spinal Cord Injury and Clinical Presentation
Paraplegia is motor, sensory, and autonomic impairment of the trunk, lower extremities, and pelvic organs resulting from a spinal cord or cauda equina lesion at T2 or below—Crucially, because the brachial plexus (C5–T1) exits above T2, upper extremity motor and sensory function is 100% intact! Functional prognosis is stratified by level: High Thoracic (T2–T6): intercostals/abdominals paralyzed, poor trunk balance, risk of Autonomic Dysreflexia (up to T6); Low Thoracic (T7–T12): partial-to-full abdominal & back extensor control, strong cough, independent wheelchair & floor-to-chair transfers; Lumbosacral (L1–S5): preserved hip flexors (L2), quadriceps (L3 — household/community ambulation with AFOs!), and ankle dorsiflexors (L4).Note that T12–L1 Conus Medullaris / Cauda Equina lesions produce a Lower Motor Neuron (flaccid, areflexic) paraplegia!
Paraplegia (lower body paralysis / T2 and below spinal cord injury) affects movement and sensation in the lower trunk and legs while leaving your arms, hands, and shoulders 100% strong and intact. Whether your goal is walking with braces/crutches in incomplete or lower-lumbar injuries, or mastering effortless transfers and active wheelchair life, protecting your shoulders, keeping your hips straight with daily tummy-lying, and protecting your skin are the keys to total independence!
Treatment and Exercise Videos
Phase-based physiotherapy protocols, mobilization, and therapeutic exercises
Step-by-step recovery and safe home exercise applications

Home Exercises and Transfer Training for Spinal Cord Injury (Paraplegia / Tetraplegia)
Phase 1: Acute Symptom Modulation, Tissue Protection & Early Activation: Phase 1 Clinical Focus & Tissue Protection: Phase 1 — Contracture Prevention, Prone Lying & Upper Body Hypertrophy Phase: Mandatory 30 minutes of daily Prone Lying (flat on the stomach) to prevent hip flexion contractures, passive/active-assisted ankle pumps, towel gastro-soleus stretches & supine heel slides, and superficial/deep respiratory expansion.
Step 1: Calming Pain, Protecting the Area & Gentle Starter Motion: Your Shoulders Are Your Lifeline—Protect Them! Because you use your arms for every transfer and wheelchair push, shoulder tendonitis is common if you only push forward. Doing daily shoulder blade squeezes (scapular retraction) and outward rotation exercises keeps your shoulders pain-free for life.

Seated Balance and Trunk Strengthening Exercises After Spinal Cord Injury
Phase 2: Progressive Mobility, Motor Control & Targeted Strengthening: Phase 2 Progressive Mobilization & Motor Control: Phase 2 — Seated Pressure Relief, Transfer Power & Shoulder Protection Phase: Seated wheelchair push-ups (lifting buttocks every 20 min for skin protection + building triceps/latissimus transfer power!), scapular retraction & towel-supported external rotation (protecting wheelchair-user shoulders from rotator cuff tears!), and seated trunk balance perturbations.
Step 2: Restoring Flexibility & Building Supporting Muscle Strength: 30 Minutes on Your Stomach Every Day: Sitting in a wheelchair bends your hips at 90 degrees all day; lying flat on your stomach for 30 minutes every day stretches the front of your hips straight so you can stand in braces or a standing frame.
Clinical Assessment, Goniometry & Special Test Videos
Displayed only in Healthcare Professional mode (hidden in Patient mode)

Systematic Neurological Examination: Reflex, Sensory, Tone, and Motor Assessment
Goniometric ROM & Postural / Kinematic Analysis: ISNCSCI T2–S5 sensory level and L2–S1 lower extremity motor score (LEMS 0–50), plus hip extension (Thomas test) and ankle dorsiflexion goniometry.

Manual Muscle Testing (MRC 0–5 Grading) — Clinical Motor Strength Examination
Special Clinical Provocation & Neurological/Functional Tests: Seated Trunk Balance Assessment (Static, Dynamic, and Multidirectional Reach), SCIM-III, WISCI-II, and Shoulder Impingement Screen (in manual wheelchair users).